|
||||
| ||||
Main Menu |
||||||||
|
|
||||||||
Contact |
||||||||
|
|
||||||||
Linksys WRT54GS Wireless Setup
NOTE: This procedure applies to the Linksys Wireless Router WRT54GS - but the general settings and descriptions can also apply to other wireless routers - although the format will be different and some of the terms may have some variation. Studying this example can help set up other wireless routers.
To set up and/or change the settings on this and most wireless router (and router/modems), you can use a web interface.
- Run the 'Network Setup Wizard' from the Control Panel on your computer. This step is not necessary if you already have a home network operating and only wish to CHANGE a setting to your wireless set up - such as security settings and such.
- Run the Wireless Network Setup Wizard from the control Panel on your computer - not necessary if you already have wireless and only wish to change settings - such as security and such.
- Open Internet Explorer – or whatever web browser you normally use.
-
In the ‘address’ line or text box (also called the URL line – this is the line where you enter a web site address, such as www.microsoft.com for example) type:
192.168.1.1 (no need to type the "http:" part - this will be added automatically - just type the numbers.
- Hit Enter (or click the right-arrow or click 'Go' -depending upon which browser you are using.)
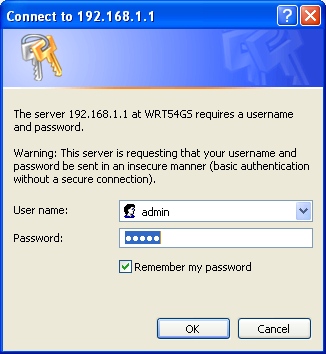
- You may get a login dialog (window) asking for a user name and password.
- Try user name ‘admin’ and password ‘admin’ – which is what Linksys uses. It could be different.
- If ‘a’ does not work, try leaving username blank and ‘admin’ for the password.
- If 'b' does not work, refer to the documentation that came with your particular wireless equipment.
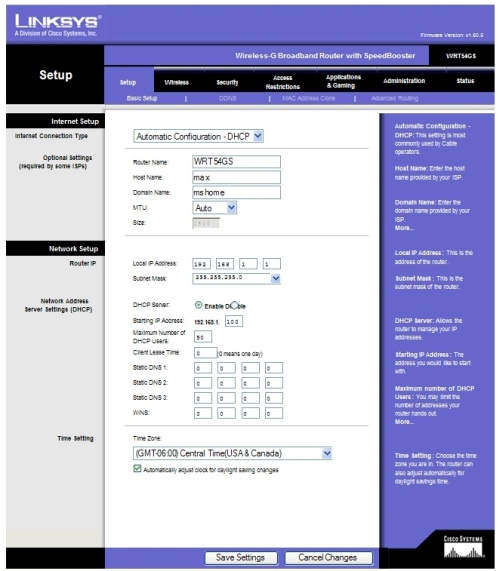
- Click 'Ok' - If you get logged in, you should get a web page that looks like the one shown below:
NOTE: If some items are too small to be read on your computer screen, HOLD DOWN your CONTROL KEY (CTRL) while at the same time forward ROLLING the CENTER WHEEL on your MOUSE (if your mouse is so equipped) to ENLARGE, or ZOOM IN on the displayed images and text. Reverse ROLLING the CENTER WHEEL on your MOUSE will also effectively ZOOM OUT on the displayed information. (This 'trick' applies to all web pages viewed in Microsoft ™ Internet Explorer.)

Login Dialog for Microsoft™ Internet Explorer


Most items on the General page are defaulted. You must supply the following:
Host Name: in this example the host name is 'max' - this is the name of the computer which hosts the wireless - your main computer.
Domain Name: in this example the domain name is 'mshome' - this is the domain name that was set up during the 'network setup wizard' run.
These names are found by selecting: START --> Control Panel --> System -->
This brings up the 'Systems Properties' window - next CLICK the ' Computer Name' TAB:
- Host name corresponds to 'Full Computer Name' on this tab
- Domain name corresponds to 'Workgroup' on the 'Computer Name' TAB.
- Supply the Host Name ('computer name' of the main, or host computer.)
- Supply the Domain Name (workgroup if you are not using domains)
- Enable (check) DHCP
- Set your TIme Zone
- Click 'Save Settings' button.
- Next, CLICK the 'Wireless' tab at the top of the page
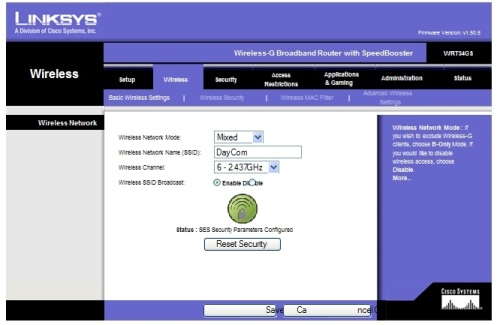
- Make sure you are in the 'Basic Wireless Settings' tab, as shown below

Wireless - Basic Wireless Settings:- General Wireless Setup - shown for Mixed ModeFour possible modes are:
- Disabled (no wireless operation possible)
- Mixed [will allow BOTH 802.11B AND 802.11G type equipment to work on the wireless network] *Recommended
- B Only [ Will allow only 802.11B wireless equipment]
- G only [ will allow only 802.11G wireless equipment]
Selecting the 'Mixed' mode will allow some of the older (and slower) 802.11B equipment to work on your network. We recommend using 'mixed' mode unless you are sure your network will not have any of the older 'B' type wireless equipment.
Note: there is currently also 802.11N equipment available which allows for faster speeds than the 'G' mode. These are newer and more expensive and for simple home and office use they do not afford a great deal of added value. But the same principles apply to the newer 'N' type wireless - and we still recommend checking 'Mixed' to not exclude any of the very prevalent 'G' type equipment from your wireless network.
-
You may select to ENABLE or DISABLE the SSID Broadcast - with SSID Broadcast disabled, other people in the area will not 'see' your wireless network when they 'search for wireless networks'; with SID Broadcast enabled, other people can 'see' your wireless network but will not be able to logon unless they know the Passphrase / Key1 word. It may be better security to DISABLE the SSID Broadcast - this is up to you. We suggest you ENABLE it for initial setup, the later DISABLE SSID Broadcast.
-
Click 'Save Settings' button.
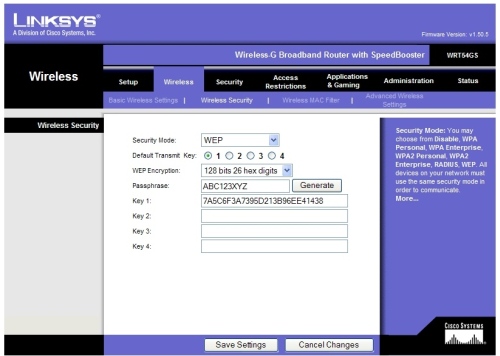
- Next, click the 'Wireless Security' TAB (in the Wireless Settings Page)

Wireless - Wireless Security - Wireless Setup for 128 Bit WEP Mode - examplePick your own Passphrase - click 'Generate' and Key1 will get generated.
You may or may not need the 28 character 'Key1'
It is best to jot down BOTH the 'Passphrase' AND the 26 character 'Key1' since some wireless equipment require one and some the other. - Click 'Save Settings' button.
- The rest of the settings on other tabs should be ok if left in their original default states.
- Next Run the Wireless Setup Wizard from the control panel and make SURE your wireless network is:
- Set for WEP encryption (as set above in the example)
- All wireless networked devices have the exact same Passphrase and/or 26 character Key1 Code
- The SSID is the SAME for all wireless networked devices.
NOTE: This procedure applies to the Linksys Wireless Router WRT54GS - but the general settings and descriptions can also apply to other wireless routers - although the format will be different and some of the terms may have some variation. Studying this example can help set up other wireless routers.
| Support Area |
Copyright ©DayComSolutions.com 2005-2012 All Rights Reserved |
