|
|
||||
| ||||
Sunbelt Security ClearCloud DNS Server (FREE)
THIS SERVICE HAS BEEN DISCONTINUED BY SUNBELT AND IS NO LONGER AVAILABLE
Sunbelt Software offers DNS servers that if used will can warn you when you try to visit a known 'bad' website.
A DNS (Domain Name System) Server handles our resource requests on the internet. Basically, all servers that hold resources, such as websites and their attendant files, have an IP (Internet Protocol) address. An IP address is actually just a 32 bit number (currently using IPv4) usually expressed in dot-decimal notation such as: 26.118.128.27 or 192.168.1.1 and so on. IP addresses may be presented in other notations.
Humans are not good at remembering such long numbers, so most resources on the internet are given names with which we humans can identify. For example, MSN.com, Microsoft.com and DayComSolutions.com - to name a few giants of the industry - are all URL's (Uniform Resource Locators) - but in the final analysis, they equate to 32 bit IP addresses - a string of up to 12 digit number. It is the job of the DNS Servers to change your named request (such as MSN.com) into the proper IP Address. [For Example: the IP address for msn.com is: 65.55.206.203; microsoft.com is: 207.46.197.321 - as you can see, it is SO much easier for us to remember the names!]
You can pick your own DNS Server, or let it be picked automatically by hardware or by your ISP (Internet Service Provider). Most people are not aware that their requests for resources go through a DNS Server and likewise not aware what the IP of that server(s) is. The following is a procedure that allows you to pick your own DNS Server(s). These particular DNS servers keep track of sites that have been reported to have malicious software and will block them for you, thereby protecting your computer from such sources of malicious code.
Using the ClearCloud DNS Server does not guarantee you will never go to a site that has malicious code, but it does afford a much higher level of protection than many or most DNS Servers.
NOTE: There is a TEST site available - see 'Test' at bottom of this article.
How it Works
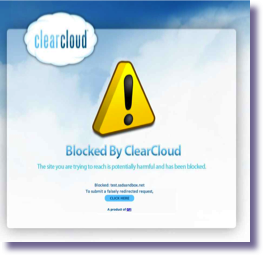
What happens is that after you have set the ClearCloud DNS Server address settings, when you attempt to load a page that is considered part of a malicious site (IP), the ClearCloud DNS Server will re-route you to their 'Blocked Site" warning page.
Before you make any changes!
Before you make any changes in your DNS settings, WRITE DOWN any existing setting that might be there. Usually, there will be no value entered in the DNS settings before yo type in the ClearCloud settings - but SOME Internet Service Providers (ISPs) require you to use DNS settings that they specify. IF things quit working, you can go back and re-enter the DNS settings that were there before you made the changes.
Set up Router (not required)
Skip this section if you are not comfortable changing your router settings.
If you set up the ClearCloud DNS addresses in your router, then ALL computers that are behind that router (all computers on your network) will be afforded the ClearCloud protection and you will not have to set up DNS settings for individual computers - IF those computers are always used behind your set-up route they will thereby be afforded the ClearCloud protection.
If you have a notebook computer that you connect to the interned via third party routers, such as WiFi services, then you need to make the DNS settings in the computer itself in order to obtain the ClearCloud protection.
If you are knowledgeable and comfortable changing your router settings, you can put the ClearCloud DNS Server address into your router so that any PC behind it benefits from the protection afforded by the ClearCloud DNS Servers. Router setup varies widely from one type to another and is beyond the scope of this article.
If you know how to set DNS Server IP addresses in your router, add the two ClearCloud DNS Servers:
74.118.212.1
74.118.212.2
Instructions for installation on a Windows PC (various versions) (not required)
Below are instructions for installation on a single PC for various Windows Versions. This is one method for setting up ClearCloud. You can skip this section if you like and go directly to the instructions for setting up your computer based on that computer's operating system (Windows XP, Windows Vista and Windows 7) and Mac OS.
Set up ClearCloud the easy way
Download and install the ClearCloud utility and automatically enable and disable ClearCloud at the click of a button.
1. Download ClearCloud.
2. Follow the on-screen instructions to install.
3. Open the ClearCloud Utility by double-clicking the ClearCloud icon on your computer's desktop
Set up ClearCloud on Windows PCs
Below are instructions for installation on a single PC for various Windows Versions
Windows XP | Windows Vista | Windows 7 | Apple | Test ClearCloud
Windows XP
How to Setup ClearCloud on Windows XP
1. Open the Control Panel from your Start menu.
2. Click Network Connections and choose your current connection.
3. On the General tab of the Connection Status screen, click Properties.
4. On the General tab of Connection Properties, scroll down and select Internet Protocol (TCP/IP), then click Properties.
5. On the General tab of Internet Protocol (TCP/IP) Properties, in the lower section select "Use the following DNS server addresses," then enter the ClearCloud IP addresses:
Preferred DNS server: 74.118.212.1
Alternate DNS server: 74.118.212.2
6. Click OK until each window is closed. You are now using ClearCloud
Note: Advanced users can select Advanced and enter DNS server addresses in sequence.
To disable ClearCloud on Windows XP
1. Open the Control Panel from your Start menu.
2. Click Network Connections and choose your current connection.
3. On the General tab of the Connection Status screen, click Properties.
4. On the General tab of Connection Properties, scroll down and select Internet Protocol (TCP/IP), then click Properties.
5. On the General tab of Internet Protocol (TCP/IP) Properties, in the lower section select "Use the following DNS server addresses," select, "Obtain DNS server address automatically."
6. Click OK until each window is closed. You have now reverted to your original setting.
Note: If you are an Advanced user, click the Advanced tab to remove the ClearCloud DNS entry and revert to your previous DNS server setting.
Windows Vista
How to Set Up ClearCloud on Windows Vista
1. Open the Control Panel from your Start menu.
2. Open "Network and Sharing Center."
3. In the Network section, select "View Status" of each connection.
4. On the General tab of the Connection Status screen, click "Properties."
5. On the General tab of Connection Properties, scroll down and select "Internet Protocol Version 4 (TCP/IPv4)," then click "Properties."
6. On the General tab of Internet Protocol Version 4 (TCP/IPv4) Properties, in the lower section select "Use the following DNS server addresses," then enter the ClearCloud IP address:
Preferred DNS server: 74.118.212.1
Alternate DNS server: 74.118.212.2
7. Click OK until each window is closed. You are now using ClearCloud.
Note: Advanced users can select Advanced and enter DNS server addresses in sequence.
To disable ClearCloud on Windows Vista
1. Open the Control Panel from your Start menu.
2. Open "Network and Sharing Center."
3. In the Network section, select "View Status" of each connection.
4. On the General tab of the Connection Status screen, click "Properties."
5. On the General tab of Connection Properties, scroll down and select "Internet Protocol Version 4 (TCP/IPv4)," then click "Properties."
6. On the General tab of Internet Protocol Version 4 (TCP/IPv4) Properties, in the lower section select "Use the following DNS server addresses," select, "Obtain DNS server address automatically."
7. Click OK until each window is closed. You have now reverted to your original setting.
Note: If you are an Advanced user, click the Advanced tab to remove the ClearCloud DNS entry and revert to your previous DNS server setting.
Windows 7
How to Set Up ClearCloud on Windows 7
1. Open the Control Panel from your Start menu.
2. Under the "Network and Internet" section, click "View network status and tasks."
3. In the "View your active networks" section, open the listing to the right of "Connections:"
4. On the General tab of the Connection Status screen, click Properties.
5. On the Network tab of Connection Properties, scroll down and select "Internet Protocol Version 4 (TCP/IPv4)," then click Properties.
6. On the General tab of Internet Protocol Version 4 (TCP/IPv4) Properties, in the lower section select "Use the following DNS server addresses," then enter the ClearCloud IP address as the Preferred DNS server:
Preferred DNS server: 74.118.212.1
Alternate DNS server: 74.118.212.2
7. Click OK until each window is closed. You are now using ClearCloud
Note: Advanced users can select Advanced and enter DNS server addresses in sequence.
To disable ClearCloud on Windows 7
1. Open the Control Panel from your Start menu.
2. Under the "Network and Internet" section, click "View network status and tasks."
3. In the "View your active networks" section, open the listing to the right of "Connections:"
4. On the General tab of the Connection Status screen, click Properties.
5. On the Network tab of Connection Properties, scroll down and select "Internet Protocol Version 4 (TCP/IPv4)," then click Properties.
6. On the General tab of Internet Protocol Version 4 (TCP/IPv4) Properties, in the lower section select "Use the following DNS server addresses," select, "Obtain DNS server address automatically."
7. Click OK until each window is closed. You have now reverted to your original setting.
Note: If you are an Advanced user, click the Advanced tab to remove the ClearCloud DNS entry and revert to your previous DNS server setting.
Apple Mac OS-X 10.6.x
Click System Preferences
Click Network - select network to work with: i.e. Ethernet 1, Wireless, etc.
Click Advanced
Click DNS
Hit the "+" button and add a DNS Server address
Repeat above step to add more....
Add the two ClearCloud DNS Server IP addresses:
74.118.212.1
74.118.212.2
Test ClearCloud (on any system)
Here are 2 links that you can use to verify that the DNS addresses were entered correctly ClearCloud is working properly.
- Link 1 is a 'test' blocked site
- Link 2 is a 'test' clear site
(do not type a "www" - click on links or type links as shown)
ClearCloud "Blocked Site" test LINK 1: test.ssdsandbox.net
ClearCloud "Non-Blocked Site" test LINK 2: clearcloudtest.ssdsandbox.net

| Support Area |
All graphics, logos, advertisements and
promotions are Copyright ©DayComSolutions.com 2005-2012 All Rights Reserved |